

Since Google has made HTTPS mandatory to index a website, you must apply for SSL certificates. This blog shows you the step-by-step guide to installing an SSL certificate on Linux.
1. Prerequisite
Before installing the SSL certificate for your website, you must add an ‘A record‘ to your domain’s registrar to point the domain name to your host. Unless you operate a highly sophisticated business and need multiple subdomains, I always recommend people focus on the www subdomain, such as www.chatmia.ai, for the best possible SEO results.
Please refer to our blog for how to add ‘A record‘ on Namecheap and Porkbun.
2. Free vs. Paid SSL Certificate
If you google SSL certificate, you’ll find companies and hundreds of articles trying to sell you a paid SSL Certificate. Considering the free SSL certificate provider adds more features (wildcard support, auto-renew, etc.), the main argument left is that a paid SSL certificate can provide extra validation. I have summarized the main differences between types of SSL certificates.
| Abbr | Full Name | What being Validated | Websites |
| DV | Domain Validate | Domain Ownership | google.com, amazon.com, harvard.edu |
| OV | Organization Validation | + Applicant’s Organization | godaddy.com, ncsu.edu |
| EV | Extended Validation | + Applicant’s jurisdiction etc. | ssl.com |
Google does not discriminate against Certificate types when ranking websites. As a matter of fact, the Google Chrome’s (as well as other popular browsers) address bar showed OV/EV certificates a little differently. But they dropped this practice at a later time.
As you may see, even Google and Amazon only use the DV type. For small businesses and personal bloggers, there is no reason that a DV certificate is not enough for you. If you are interested in how to find a certificate type, please refer to this blog on ssl.com and check a few of your favorite websites.
3. Install Certbot/SSL Certificate on Linux
Let’s Encrypt is a nonprofit Certificate Authority providing TLS certificates to 300 million websites. Certbot developed by Electronic Frontier Foundation (EFF) is a tool that automatically deploys Let’s Encrypt SSL Certificate to your host.
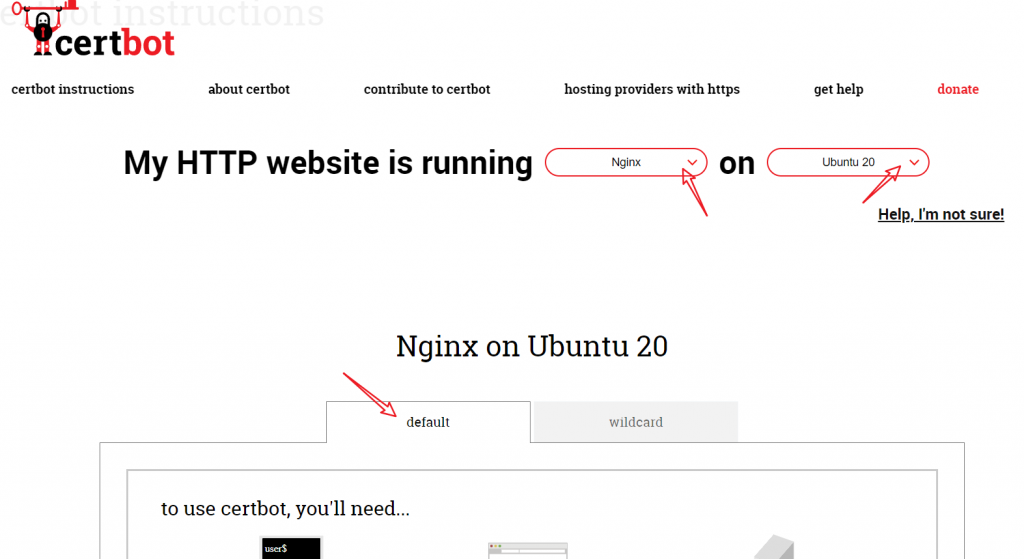
The official certbot website provides instructions for different Linux flavors and Sever software combinations. Please open the above link, and follow step by step. I want to point out that usually, you do not need to install a wildcard SSL certificate for *.yourdomain.com. For better SEO, I recommend you focus on building www.yourdomain.com. When you need something like something.yourdomain.com, ask yourself whether www.yourdomain.com/something/ is okay. However, if you have a service that does not rely on search engines’ traffic, feel free to use subdomains and apply for a wildcard SSL certificate.
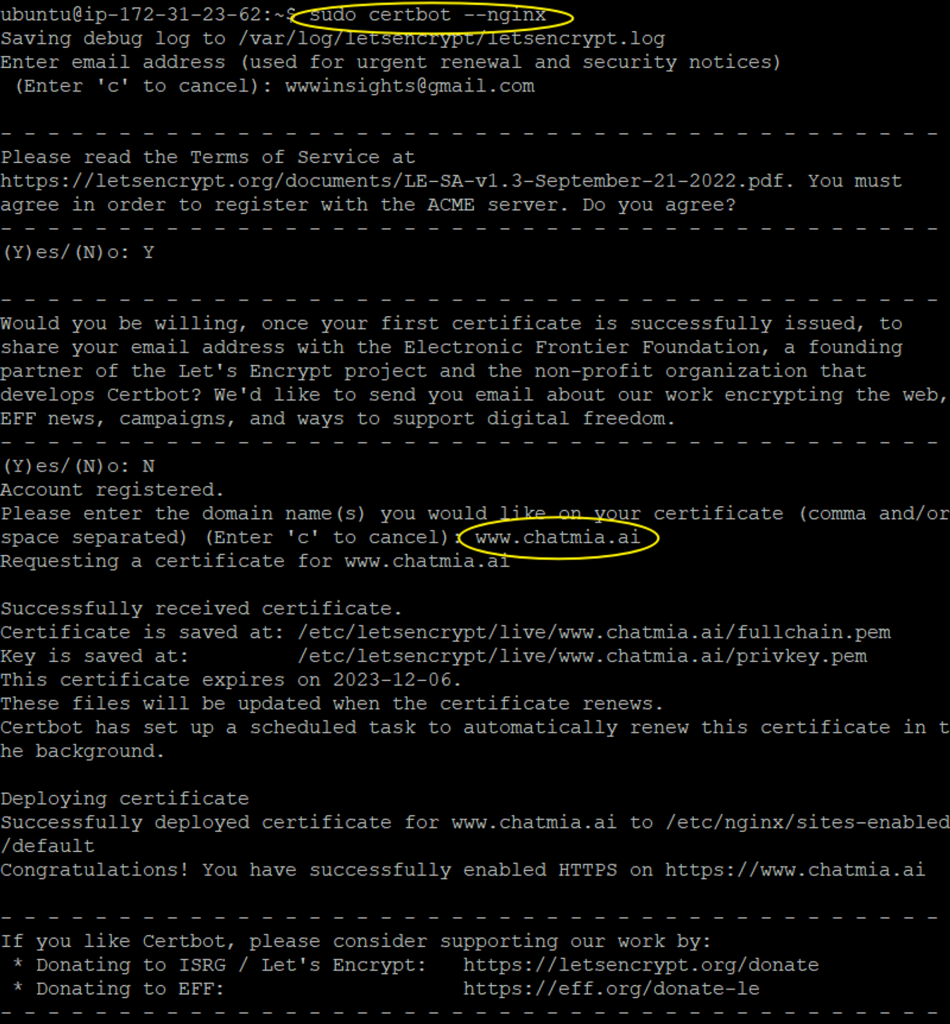
As for the website server Linux distribution, I always recommend the latest Ubuntu LTS. I used to choose CentOS, but it has been discontinued. You’ll notice how easy it is to install certbot on Ubuntu 22.04. We only need three lines to install it.
sudo snap install --classic certbot
sudo ln -s /snap/bin/certbot /usr/bin/certbot
sudo certbot --nginx
Following the prompt to enter www.yourdomain.com.
4. Changes in Nginx by certbot
If we only apply for a certificate using certbot by sudo certbot certonly --nginx, the nginx configuration won’t be changed, and we need to manually add the certificate path, and redirect any HTTP traffic to HTTPS. Let’s take a look at what has been changed if we let certbot to automatically update Nginx configuration.
Open your Nginx configuration file. You may find it through nginx -t. Then, follow the entry file to locate the website configuration file. It’s usually /etc/nginx/sites-available/default or /etc/nginx/sites-available/yourname.com if you have manually renamed it. Open the file, and search for any lines commented with # managed by Certbot.
In the HTTPS server block, you’ll see how it tells the certificate path to the Nginx server.
server {
    server_name www.chatmia.ai; # managed by Certbot
    listen [::]:443 ssl ipv6only=on; # managed by Certbot
    listen 443 ssl; # managed by Certbot
    ssl_certificate /etc/letsencrypt/live/www.chatmia.ai/fullchain.pem; # managed by Certbot
    ssl_certificate_key /etc/letsencrypt/live/www.chatmia.ai/privkey.pem; # managed by Certbot
    include /etc/letsencrypt/options-ssl-nginx.conf; # managed by Certbot
    ssl_dhparam /etc/letsencrypt/ssl-dhparams.pem; # managed by Certbot

}
You’ll see how the HTTP traffic is redirected to HTTPS in the HTTP server block.
server {
    if ($host = www.chatmia.ai) {
        return 301 https://$host$request_uri;
    } # managed by Certbot

    listen 80 ;
    listen [::]:80 ;
    server_name www.chatmia.ai;
    return 404; # managed by Certbot
}
5. Summary
Very likely, a free SSL certificate will meet your needs. Certbot is the best free SSL certificate provider for self-managed website hosts. As long as you know the hows, installing it takes only 1 minute.
Feel free to explore more topics about Network here, and you are more than welcome to leave a comment below.
[Credit: Featured image is proudly generated by Midjourney]